Showing posts with label jen atkin. Show all posts

Friday, October 15, 2010

Fall Styles For All Lengths

Celebrity hairstylist, Jen Atkin just returned from Paris fashion week where she was tending to the tresses of many of the fabulous runway shows.

I thought it would be helpful to get her views on what's the next "it" style for every hair length.

Here's what Jen has to say:

"Freja's haircut is very popular.  It's great for growing out short hair by shagging it up.  Saw this all over Paris this season.

Alternative for round faces is just a shag, no bangs.

If your hair is straight and long, best look is a below the collarbone blunt hair cut, no layers, again bangs are optional."


Looks like bangs are the in-trend this season...

Will you be rocking them?!

Monday, December 14, 2009

How To: 80's Hair

Baby got hair.

Where's Jennifer Beals when we need her?

Sarah Jessica Parker debuted this 80's Flashdance 'do on the set of Sex and the City 2. While shoulder pads and knee socks are making a fashion comeback, it looks like big hair is no longer considered a beauty blunder.

Jen Atkin of the Andy Lecompte Salon says that "the 80's are back. Think Weird Science, Kelly Lebrock wild hair."

To achieve the 80's tease, Jen suggests starting with Leonor Greyl Mousse Au Lotus Volumatrice and a defusser to give your mane added volume. Then use a T3 3/4 inch curling iron once dried to define curls. Spray Rene Furterer Fixation Forte Strong Hold hairspray for hold and shine all over, including roots. Tease the hair, focusing on the crown of the head, with a Sheila Stotts Brush. Finish with another few mists of hairspray.

We have a feeling that this throwback 'do is Aquanet's dream come true.

Would you rock the look?

HL-sjp-80'shair.jpg


Thursday, November 05, 2009

How To: The Wavy, Loose Bun

This is a great look created by my friend, the fabulous Jen Atkin of the Andy Lecompte Salon. Originally worn by Mad Men's Christina Hendrick's at the Emmy's, the wavy, loose bun is an easy and simple alternative to party-worthy hair.


Get the look:


Use PhytoActif Volume Spray on damp hair to create volume. Then, using a Mason Pearson Brush, blow dry section by section making sure to get any frizzy hair along the hairline.
TIP: Part the hair with a side part so it doesn't look so casual.

Prep hair with Frederic Fekkai Sheer Spray (my new obsession) and curl 1" sections in a vertical direction using the t3 tourmaline 1 inch curling iron. Loosen up the curls by shaking them out with Frederic Fekkai Full Volume Mousse.

Pull the back of her hair into a low pony, and make a loose chignon (bun). Secure with hair pins and gather random pieces from each side of the head and pin back. Keep everything loose and low so it doesn't look too tight and "done."

Finish the look by spraying all over with more Sheer Spray. The great thing about that hairspray is it doesn't get too stiff and hair still holds but moves at the same time.

Monday, August 31, 2009

How To: Flat Iron Curls

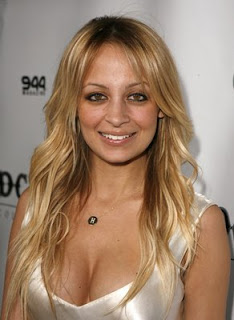
Out of the 900 plus posts that I have published on Beauty Banter, the one that garners the most interest is that of Nicole Richie's Hippy-Chic Curls.

So, I've decided to post the full tutorial with step-by-step instructions and photos. Thanks to Jen Atkin of the Andy Lecompte Salon for demonstrating exclusively to BB on how to create flat iron curls at home.

Celebrity Inspiration: Nicole Richie, Alexa Chung, Lauren Conrad, Gwyneth Paltrow


Step 1: Air dry hair. If hair is curly, blow dry straight first.

Step 2: Section hair in 1 inch vertical panels from left of head to right.


Step 3: Using a 1 inch flat iron (Jen suggests the Chi Flat Iron), take the first panel of hair and starting 2 inches from scalp, put hair INTO the flat iron.


Step 4: Holding the flat iron vertically from the floor, twist down and in a backwards motion - for the left side of head, twist down, back and left. For the right side of head, twist down, back and right. *Always twist away from the ear*


Step 5: Release hair from flat iron and twist hair in backwards motion around finger, pulling while hot to stretch and elongate the curl


TIP:
for the back of head, split it down the middle from crown to nape - left side curl in left backward motion, right side curl in backward right motion. Think Farrah Fawcett's feathered hair - back and away!


Step 6: For a light hold, finish by spraying hair with Frederic Fekkai Sheer Hair Spray

TIP: To lengthen the curls even more, once you've completed the curl, use the flat iron over the ends of hair to create the straighter ends. The vertical "boho" curls give the appearance of longer hair.

Here's how it looks from the back:

So, invest in a flat iron -- you can take hair from straight, to hippy-chic curly and back to straight again in no time.


Monday, June 01, 2009

How To: Messy Ballerina Bun

Hair maven, Jen Atkin of the Andy Lecompte Salon, along with my favorite DP, Noah Rosenthal, and myself, bring you this step-by-step tutorial for one of this season's hottest trends: the messy ballerina bun.

Inspiration: Erin Wasson at The Costume Institute Gala, Model as Muse - Pretty In Pink meets Rocker-chic.


The Tools


Step 1: Blow dry hair upside down. Use a diffuser to give texture to flat hair.


Step 2: Wrap 1" sections around 1" curling iron to add bend
*TIP* leave ends out for a more messy effect


Step 3: Spritz a bit of texture spray or hair spray onto the loosely curled hair. Beach water from the ocean actually works best. It gives hair that messy texture.
Product Pick: Joico Texture Spray


Step 4: Rake fingers through hair - don't use a brush as you want to keep the style messy - and secure in a high ponytail.
*TIP* place the pony off center; just above one of your eyes for an asymmetrical effect


Step 5: Tease the ponytail to give volume


Step 6: Leave one inch section out on bottom. Twist remaining hair into a tight bun, clock wise.


Step 7: Secure lopsided bun with large bobby pins - make sure to have the ends messy for a grunge effect. Don't want to be too "pretty, perfect ballerina."


Step 8: Either wrap extra hair around once and pin it or leave it out for a funky tail.


And that's it!

*photography by Noah Rosenthal

Related Posts Widget for Blogs by LinkWithin